
To eliminate window tint safely and effectively, gather essential tools like a heat gun and sharp blade. Prepare a well-lit area and protect your workspace. Heat the film to peel it off gradually, preventing damage. Remove residue with rubbing alcohol and a cloth. Clean the glass with a quality cleaner and microfiber cloth. Inspect for imperfections and touch them up. Maintain clear windows with gentle cleaning and regular upkeep. Remember, proper technique is key to achieving spotless, streak-free windows. Mastering these steps is vital for flawless window tint removal.
Key Takeaways
- Prepare a well-lit, ventilated workspace with the necessary tools.
- Apply heat to soften the adhesive for safe tint removal.
- Gently remove the tint film slowly to prevent damage.
- Use rubbing alcohol or adhesive remover for residue.
- Clean glass with quality products for a clear finish.
Importance of Proper Window Tint Removal
When removing window tint, ensuring proper removal is vital to prevent damage to the glass surface and maintain visibility. Proper removal involves taking the time to do it correctly, ensuring that the adhesive and film come off cleanly without leaving behind any residue. This process not only preserves the integrity of your windows but also ensures that you can see clearly through them after the tint is removed.
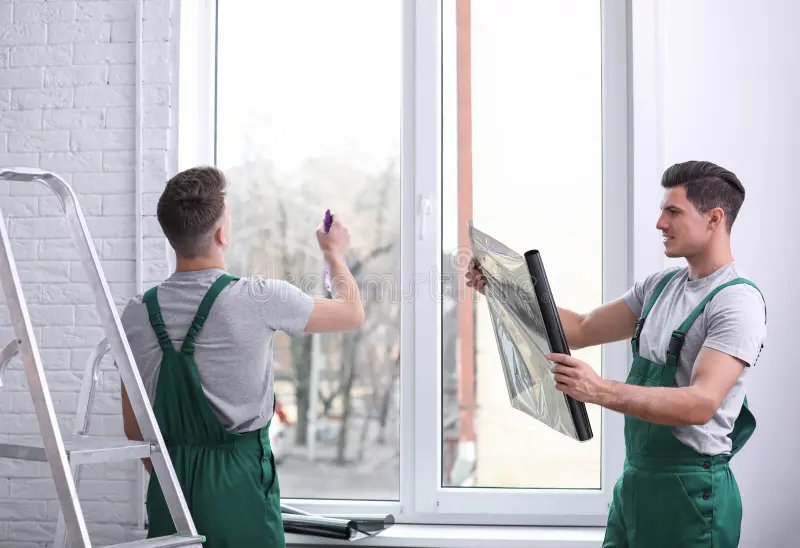
One vital aspect of proper window tinting removal is using the right techniques. Carefully peeling off the tint film, starting from one corner and gradually working your way across, can help prevent any tearing or adhesive from sticking to the glass. Additionally, using a steamer or heat gun to soften the adhesive makes it easier to remove the tint without damaging the window.
It is also important to bear in mind the environmental conditions when removing window tint. Working in a warm environment can make the adhesive more pliable, aiding in its removal. However, if the weather is cold, using a heat source to warm up the tint can help in the removal process.
Necessary Tools for the Job
To effectively remove window tint, you’ll need specific tools designed to aid in the removal process with precision and efficiency. The primary tool required is a heat gun or a handheld steamer. These tools are essential for softening the adhesive behind the tint, making it easier to peel off without leaving residue. A heat gun is recommended for larger windows, while a handheld steamer works well for smaller, more intricate areas.
Additionally, a sharp utility knife or razor blade is necessary for cutting through the tint and adhesive. Make sure to use these tools carefully to avoid damaging the glass. A plastic scraper or razor blade holder can also be useful for scraping off any remaining adhesive after the tint has been removed.
To clean the windows after removing the paint, you’ll need a glass cleaner, a microfiber cloth, and some soapy water. These will help eliminate any leftover adhesive or dirt, leaving your windows clear and spotless. Remember to work in a well-ventilated area and wear gloves to protect your hands from the heat and chemicals involved in the removal process.
Having the right tools at your disposal will make the window tint removal process smoother and more effective. By using these tools with care and precision, you can achieve professional results without damaging your windows.
Preparing the Work Area
Prepare your work area meticulously to ensure a smooth and efficient window tint removal process. Start by choosing a well-lit and ventilated space to work in. Natural light will help you see any remaining adhesive after the tint is removed, while proper ventilation will prevent you from inhaling fumes during the process.
Next, gather all the necessary tools you prepared earlier, such as a heat gun or hairdryer, a razor blade or scraper, and a cleaning solution. Lay down a drop cloth or old towels to protect the interior of your car from any water or adhesive residue that may drip during the removal process.
Clear out any unnecessary items from the car interior to give yourself ample space to work comfortably. This will also prevent any obstacles that may hinder your movements while removing the tint.
Ensure that all windows are rolled down slightly to allow for easy access to the edges of the tint film. If any obstacles like decals or stickers are present on the windows, consider removing them beforehand to avoid any damage during the removal process.
Peeling Off the Tint Film
To start peeling off the window tint film, you need to apply heat using a heat gun or a hairdryer, making the adhesive soft and easier to remove. Begin peeling from a corner and proceed slowly and steadily to prevent the film from tearing or leaving residue behind.
Take your time and be patient, as rushing through this process may damage the window surface.
Heat and Peel
For a safe and effective removal process, consider utilizing heat to facilitate the peeling off of the tint film from your window. Start by using a heat gun or a hairdryer on the lowest setting to warm up a corner of the tint film. Be careful not to overheat the film, as this could damage the window.
Once the corner is warm to the touch, gently lift it with your fingernail or a razor blade. Slowly peel the film off in a smooth and steady motion, making sure not to rush to avoid tearing the film.
If you encounter any resistance, apply more heat and continue the process until all the tint is removed. Remember, patience and heat are key to successfully peeling off window tint.
Slow and Steady
When peeling off the tint film from your window, proceed slowly and steadily to ensure a smooth removal process without causing damage. Here are some tips to help you with this task:
- Start from a corner: Gently lift a corner of the tint film using a razor blade or your fingernail.
- Peel at a 45-degree angle: Slowly peel the film at a 45-degree angle to prevent tearing.
- Use a steady hand: Maintain a steady hand to ensure even and controlled peeling.
- Apply heat if needed: If the film is stubborn, use a heat gun or hairdryer to soften the adhesive for easier removal.
With these steps, you can remove the tint film effectively without any hassle.
Dealing With Adhesive Residue
If you discover adhesive residue after removing window tint, gently rubbing alcohol can effectively dissolve and remove it without harming the glass surface.
To address this task, start by moistening a clean cloth with rubbing alcohol. Gently massage the impacted area in circular motions, allowing the alcohol to break down the adhesive residue. For stubborn spots, you may need to apply a bit more pressure while making sure not to scratch the glass.
Once the rubbing alcohol has loosened the adhesive, use a clean, dry cloth to wipe away the residue. Repeat the process as necessary until the glass is free of any sticky remnants. It’s crucial to be patient and meticulous during this step to achieve a smooth and clean finish.
If the residue persists, you can also try using a specialized adhesive remover. Apply a small amount of the remover onto a cloth and gently rub it onto the affected area. Follow the product instructions carefully to ensure safe and effective removal.
Using Heat for Removal
Consider applying controlled heat to the window tint to facilitate its removal more easily and efficiently. Using heat can help soften the adhesive, making it simpler to peel off the tint from the window surface.
Here are some tips for using heat effectively:
- Hair Dryer Method: Use a hairdryer on high heat to warm up a corner of the tint. Once heated, slowly peel the tint off while keeping the heat directed at the adhesive to soften it further.
- Heat Gun Technique: If you have a heat gun, set it to a low to medium heat setting. Hold the gun a few inches away from the tint and move it back and forth across the film to warm it up gradually. Be cautious not to overheat and damage the glass.
- Sunlight Exposure: Park your car in direct sunlight on a warm day to naturally heat the tint. The heat from the sun will help to loosen the adhesive, making it easier to remove.
- Plastic Wrap Trick: Cover the tint with a clear plastic wrap to trap the heat. Let it sit for an hour or so under direct sunlight or with a heat lamp. The trapped heat will aid in softening the adhesive for a smoother removal process.
Employing a Steamer for Tough Tint
To tackle stubborn window tint, utilizing a steamer can be a highly effective method for loosening the adhesive and simplifying the removal process. Steamers work by heating the tint and adhesive, making them more pliable and easier to peel off.
Here’s how you can effectively employ a steamer for tough tint removal:
- Prepare the Steamer: Fill the steamer with water and allow it to heat up according to the manufacturer’s instructions. It’s important to use a steamer with adjustable temperature settings to prevent damage to the glass.
- Steam Application: Hold the steamer close to the tinted area, moving it in a back-and-forth motion. Make sure not to keep it in one spot for too long to avoid overheating the glass.
- Peeling off the Tint: As the steam works its magic, start peeling off the tint using a razor blade or a dedicated tint scraper. The steam will have softened the adhesive, making it easier to remove the tint in one piece.
- Clean-Up: After removing the tint, use a glass cleaner and a microfiber cloth to clean any leftover adhesive residue on the window.
Cleaning and Polishing the Glass
For best results, incorporate a glass cleaner specifically formulated for automotive use when cleaning and polishing the glass after removing the window tint. This step is essential to ensure a pristine finish and a clear view through your windows.
Here are some tips to help you clean and polish the glass effectively:
- Choose the Right Glass Cleaner: Opt for a high-quality glass cleaner designed for automotive use. Look for products that are streak-free and safe for tinted windows to avoid any damage or discoloration.
- Use Microfiber Cloths: When cleaning the glass, use soft microfiber cloths to prevent scratching and leave a lint-free finish. Microfiber cloths are gentle yet effective at picking up dirt and grime without leaving residue behind.
- Apply in Circular Motions: To achieve a thorough clean and polish, apply the glass cleaner in small circular motions. This technique helps to remove stubborn residue and ensures an even distribution of the product.
- Polish for a Crystal-Clear Finish: After cleaning the glass, consider using a glass polish to enhance clarity and shine further. A quality glass polish can help remove any remaining imperfections and leave your windows looking like new.
Final Inspection and Touch-Ups
Examine the glass thoroughly for any remaining residue or imperfections before proceeding with touch-ups. Use a bright light source to check for any leftover adhesive or small bits of tint that may have been missed during the cleaning process. Pay close attention to the edges and corners of the windows, as these areas are common spots where residue can linger.
If you spot any lingering residue, you can use a razor blade at a shallow angle to carefully scrape it off. Be extremely cautious during this step to avoid scratching the glass. After removing any stubborn residue, wipe the area clean with a microfiber cloth dampened with a mild glass cleaner.
Next, inspect the windows for any imperfections such as bubbles, wrinkles, or uneven tint. If you encounter any of these issues, you can address them by carefully peeling back the affected tint with a razor blade and reapplying it using a heat gun to smooth out the wrinkles or bubbles.
Once you have completed the touch-ups, give the windows a final wipe-down with a clean microfiber cloth to make sure they’re free of any debris or streaks. Step back and admire your clear and professionally cleaned windows, ready to let the light shine through effortlessly.
Tips for Maintaining Clear Windows
To keep your windows crystal clear, use gentle cleaning techniques and a streak-free solution.
Wipe in a circular motion to prevent streaks from forming on the glass.
Regular maintenance will help maintain the transparency of your windows for a longer period.
Cleaning Techniques
Using a microfiber cloth or a squeegee when cleaning your windows can effectively maintain their clarity and cleanliness. To guarantee your windows stay crystal clear, follow these simple cleaning techniques:
- Start by dusting off the window with a soft-bristled brush to eliminate loose dirt and debris.
- Mix a solution of mild soap or window cleaner with warm water in a spray bottle for excellent cleaning.
- Spray the solution onto the window surface and gently wipe in a horizontal motion using the microfiber cloth.
- For stubborn spots, use a squeegee to remove any residue, ensuring a streak-free finish that will leave your windows looking spotless.
Preventing Streaks
To maintain clear windows without streaks, make sure that you wipe the window surface in a gentle horizontal motion using a microfiber cloth or a squeegee after applying a solution of mild soap or window cleaner mixed with warm water. This technique helps to remove any residue or dirt effectively without leaving streaks behind.
When wiping the windows, make certain that you start from the top and work your way down to prevent streaks from forming. It’s essential to use a clean microfiber cloth or squeegee for each window to avoid transferring dirt or residue from one window to another.
Review
Now that you’ve successfully removed your window tint, it’s time to enjoy the clear view ahead.
Removing window tinting not only enhances visibility and safety on the road but also ensures compliance with legal regulations, preventing potential fines or penalties. By following the proper techniques and utilizing appropriate tools, drivers can efficiently restore their windows to a clear and transparent state, prioritizing both functionality and adherence to the law. VPRO Tinters LLC offers solutions that focus on these aspects, ensuring high-quality service for their clients.